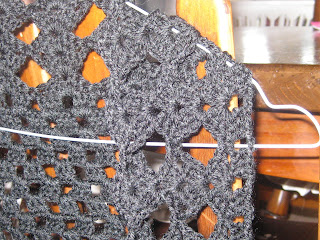
First on my list to make for Christmas is this crochet bolero for my sister
Here are my pictures of the finished bolero, I ended up having to block it slightly.
Pattern can be found here.
DISCLAIMER - This is not my pattern and in no way do I take credit for it.
Here is a rough translation of the Portuguese text on the photos into English
You will have to open the pattern to see the pictures.
Picture 1:
Google translation
start making a chain with 32 necklaces and 3 more chains to turn around and knife 3 points higher counting the 3 chains to turn.
After knife skip 2 chains and 2 basis points and knife over 3 points higher.
Keep this up until the end of his career.
Turn the piece and continue the same way until you reach the height you've desired.
This piece by piece and started back.
What I got out of it:
Ch 35, dc in the 4th ch from the hook, dc in next 2 ch's, *skip 2 ch's, dc in next 3 ch's* continue across.
Ch 4, *3 dc in ch 2 space, ch 2* repeat across, dc in end, ch 2, turn.
Picture 2:
Google translation
this part of the back and ... knife until you reach the desired height and here ve decide what size will do!
What I got out of it:
Continue with the above rows until you reach the desired length.
Picture 3:
Google translation
reaching the desired size, finish and not keep making necklaces until now only reach the size of the pit,
At this point here estamoa doing armhole.
here I made 105 necklaces and ve and who will decide the size of the pit of your picks.
(Armhole and even very wide)
What I got out of it:
Ch 105 for the armhole
Picture 4:
Google translation
finished the necklaces and reached the desired size, attach the chain with low point in the first high point of the other end and then follow with lows in each basis point of his career until earlier chegra the other side to start the armhole frazer
What I got out of it:
Attach to other end with a slip stitch, slip stitch across top. Then start other side.
Picture 5
Google translation
after doing the above step knife again the same amount of necklaces to make another pit and reattach with low until the other end and walk again with lows and closes with slip stitch
What I got out of it:
Chain 105 like the other side, join with slip stitch and slip stitch across to the other side again.
Picture 6:
Google translation
Now, we will start working all around the bolero ... I did so here:
I climbed three necklaces and three high points I jumped over 2 chains and 2 basis points and made 3 more highs and worked all around the bolero
What I got out of it:
*Dc in next 3 chains, ch 2, skip 2 chains* Repeat around
Picture 7:
Google translation:
After working all around the bolero, and he had been so close his career with slip stitch
What I got out of it:
When finished working around the bolero join to the top of first dc with a slip stitch.
Picture 8:
Google translation:
Here in this part, and who decides what extent ve do in your bolero. Use your creativity and how many careers knife desired .... if you do it will get many careers with a golinha to turn ... fizar less if he had run golinha careers. this detail is to your liking
What I got out of it:
Not much to be honest. But making it up this is what I did.
Round 1: Slip stitch until you get to first ch 2 space, ch 2, 2 dc, ch 2, 3 dc. Sc in next ch 2 space. *3 dc, ch 2, 3 dc in next ch space, sc in next ch space* until beginning. Join with a slip stitch.
Round 2: Slip stitch to ch 2 space, ch 2, 2 dc, ch2, 3 dc. Ch 6. *3 dc, ch 2, 3 dc in next ch space, ch 6*
Round 3 - 5: alternate rows 1 and 2.
Picture 9:
Congratulations if you can read this :)


That is gorgeous. Have fun making that!
ReplyDeleteThank you so much for posting the translation! I really want to make a couple of these. They are so pretty. I'm sure it took a lot of work to get that all done!
ReplyDeleteОи минха флор!
ReplyDeleteФиqуеи емоционада цом о меу пап аqуи!
Амеи демаис е фицоу муито линдооооооооооооо!
Парабéнс пелос сеус трабалхос амигаааааааааааааааа!
Амеи!
Obrigada minha flor, obrigada por tudo, obrigada por este carinho!
What size hook did you use on this?
ReplyDeleteMost probably a 4.5mm
Deleteany recommendations on types of yarn to use??
ReplyDeleteI used 8 ply for this. I can't really give a recommendation for a specific yarn due to being in a different country but I think any cotton would work well for this. I used acrylic and really regretted it when finished.
DeleteAwesome. I saw the first one awhile ago. Thanks so much for the translation.
ReplyDeleteAWESOME!!!! Love this Ty Ty Ty so much for the translation it & u r AWESOME IM ONLY ON ROW 5 & have 3 ppl wanting one lol Ty
ReplyDelete